Tampilkan postingan dengan label Anko. Tampilkan semua postingan

Minggu, 20 Januari 2013

Karintō Manjū / かりんとう饅頭


A similar Wagashi as Karintō is Karintō Manjū. From the very beginning will here added whole cane sugar to the dough. Then the dough is filled with Anko, then steamed and then deep-fried. Due to the deep-frying the sugar caramelize and get a dark brown, crispy coat. Although Karintō Manjū is a little time-consuming then the normal Karintō, but much better in taste. I personally found it better. Of course Karintō Manjū is due to the high sugar content and the anko also very sweet and suits so again very well to a cup of green tea (*^▽^*). Despite of the deep-frying they are not to greasy! Mainly you can find Karintō Manjū in Fukushima prefecture and neighboring prefectures.

The recipe I have made by Sakura no ōchikafe (さくらのおうちカフェ) and make approx. 6-8 pieces (the original recipe makes 16 pieces, but that was too small for me). Although I've used dark brown whole cane sugar, the interior of the Manjū has not become as dark as in the original recipe. Perhaps, I should deep-fry it next time a bit longer with less heat. Whatever, the taste was nevertheless very delicious.

You need:
  • 100g flour
  • 60g brown whole cane sugar
  • 10g cane sugar
  • 5tsp water
  • 1 tsp oil
  • 1/2 tsp baking powder
  • 300g anko
  • oil for frying
_____________________________________________________________________________________

Ein ähnliches Wagashi wie Karintō ist Karintō Manjū. Bei diesem Wagashi wird allerdings gleich zu Beginn brauner Vollrohrzucker dem Teig beigemengt. Anschließend wird der Teig mit Anko gefüllt, dann gedämpft und noch mal frittiert. Durch das frittieren karamellisiert der Zucker und bekommt so eine dunkelbraune, knusprige Hülle. Zwar ist Karintō Manjū etwas zeitaufwendiger wie das normale Karintō in der Herstellung, dafür aber nochmal um einiges besser im Geschmack. Ich mag es persönlich lieber. Natürlich ist Karintō Manjū durch den hohen Zuckeranteil und das Anko ebenfalls sehr süß und passt daher wieder sehr gut zu einer Tasse grünem Tee (*^▽^*). Trotz des frittierens sind sie aber überhaupt nicht fettig! Hauptsächlich findet man Karintō Manjū in der Präfektur Fukushima und benachbarten Präfekturen.

Das Rezept habe ich nach dem von Sakura no ōchikafe (さくらのおうちカフェ) gemacht und ergibt je nach Größe zwischen 6-8 Stück (im Orginal Rezept sind es 16 Stück, das war mir aber zu klein). Obwohl ich dunkelbraunen Vollrohrzucker verwendet habe, ist das Innere des Manjū nicht so dunkel geworden wie im Original Rezept. Ich hätte wohl bei weniger Hitze länger frittieren sollen. Egal, geschmeckt haben sie aber trotzdem super lecker.

Ihr braucht:
  • 100g Mehl
  • 60g brauner Vollrohrzucker
  • 10g weißen Zucker
  • 5 TL Wasser
  • 1 TL Öl
  • 1/2 TL Backpulver
  • 300g Anko
  • Öl zum Frittieren

1. Melt in a pot the sugar with the water over medium heat. Not caramelize! Then stir the oil and baking powder in it. Give the flour in a separate bowl and knead with the sugar syrup into a dough.
_______________________________________

1. In einem Topf den Zucker mit Wasser bei mittlerer Hitze zum schmelzen bringen. Nicht karamellisieren lassen! Anschließend Öl und Backpulver einrühren. Das Mehl in eine separate Schüssel geben und mit dem Zuckersirup zu einem Teig kneten.


2. Divide the dough into 6-8 equal parts. Form also as much anko balls. Roll the dough out into round circles, place the anko in the center and wrap the anko into the dough.
_______________________________________

2. Den Teig in 6-8 Teile teilen. Dementsprechend auch soviel Anko-Kugeln formen. Den Teig zu einem runden Kreis ausrollen, Anko in der Mitte platzieren und mit dem Teig umhüllen.

3. Place the Manjū on baking paper and place in a steamer. Steam over high heat 10 minutes. During the steaming process not lift the lid!
_______________________________________

3. Die Manjū nun auf Backpapier setzen und in einem Dämpfeinsatz platzieren. Bei starker Hitze nun 10 Minuten dämpfen. Während des
dämpfends nicht den Deckel hochheben!
4. Then heat in a pot the oil at 150°C and deep-fry the Manjū on both sides until dark brown. According to the original recipe the Manjū will deep-fry at 180°C and then reduced by 160°C. This was too strong for my Manjū. It burn very fast and you must be careful that they get not completely black. Therefore, reduce the heat and deep-fry at best every Manjū separately.
_______________________________________

4. Anschließend in einem Topf das Öl auf 150°C erhitzen und die Manjū auf beiden Seiten dunkelbraun frittieren. Im Original Rezept steht 180°C und dann auf 160°C reduzieren. Dies war bei mir aber viel zu stark. Die Manjū verbrennen sehr schnell und man muss aufpassen, dass sie nicht komplett schwarz werden. Daher eventuell nochmals die Hitze reduzieren und am besten einzeln frittieren.

Senin, 11 Juni 2012

Ichigo Daifuku / いちご大福


At strawberry season the Japanese classics "Ichigo Daifuku" is a must. They are rice cakes (mochi) with a filling of a strawberry which is coated with anko.
It is my favorite version of daifuku and I'm looking forward every year, when I may make them again. I like the combination of mochi, strawberry and sweet bean paste very much ^u^

For filling I chose this time homemade Tsubushian (sweet, cooked, mashed azuki beans), because I had no desire to strain the mashed bean paste through a sieve, to get finer Koshian. But even with the lumpy consistency I find it very tasty. Also very tasty and nice looking they are with a white Shiroan or pink Sakuraan filling.

The recipe I made according to Allabout.co.jp. Here you also find a picture by picture instructions for the production.
I must admit that my Ichigo Daifuku at the beginning have looked not so pretty, because the production is a bit tricky due to the sticky mochi. But with a little practice, they look in the meantime very good ;)

That for the recipe required Shiratamako you can get in Japanese supermarkets or by MarukaieStore. If you should not find it, you can also use Mochiko or standard glutinous rice flour. Personally, I would always prefer to Shiratamako!

Recipe for 8 pieces:
  • 100g Shiratamako 
  • 80g sugar 
  • 170ml water 
  • potato starch 
  • 8 strawberries 
  • 160g Koshian or Tsubushian
1. First clean the strawberries and remove the leaves. Cover each strawberry with bean paste (leave the tops free). Set aside. 

2. Mix in a bowl shiratamako, sugar and water and stir to a liquid batter. Cover the bowl with a plate.

3. Cook the mass in the microwave (approx. 700W) so long until it becomes transparent. The cooking time can vary depending on the wattage, so check the mochi mass from time to time and stir around. The complete cooking time amounts approx. 2-3 minutes.

4. Now give the finished mochi mass on a with potato starch floured work disc. Sprinkle the mochi with potato starch and divide it with a knife into 8 equal pieces.

5. Form each piece into a round disk and wrap the strawberry with bean paste completely in it. Close the mochi batter on the bottom. Ready ^^
_____________________________________________________________________________________

Zur Erdbeersaison darf natürlich auch der japanische Klassiker "Ichigo Daifuku" nicht fehlen. Es handelt sich hierbei um Reiskuchen (Mochi) mit einer Füllung aus einer mit Anko umhüllten Erdbeere.
Es ist meine Lieblingsvariante von Daifuku und ich freue mich jedes Jahr aufs neue wenn ich sie wieder machen darf. Ich mag die Kombination von Mochi, süßer Bohnenpaste und Erdbeere einfach sehr gerne ^u^

Als Füllung habe ich mich diesmal für selbstgemachtes Tsubushian (süße, gekochte, pürierte Azukibohnen) entschieden, da ich keine Lust mehr hatte die Bohnenmasse zu noch feinerem Koshian durch ein Sieb zu passieren. Aber auch mit der stückigen Konsistenz finde ich sie einfach super lecker. Ebenfalls sehr lecker und hübsch anzusehen sind sie mit einer Füllung aus weißem Shiroan oder rosa Sakuraan.

Das Rezept habe ich nach Allabout.co.jp gemacht. Hier findet ihr auch eine Bild für Bild Anleitung zur Herstellung.
Ich muss zugeben das meine Ichigo Daifuku am Anfang auch noch nicht so hübsch ausgesehen haben, da die Herstellung doch etwas kniffelig wegen dem klebrigen Mochi ist. Aber mit etwas Übung sehen sie mittlerweile doch sehr ansehnlich aus ;)

Das im Rezept benötigte Shiratamako könnt ihr in japanischen Supermärkten oder z.B. bei Dae-Yang kaufen. Falls ihr keins finden solltet könnt ihr sie auch mit Mochiko oder dem handelsüblichen Klebereismehl nehmen. Ich würde geschmacklich aber immer Shiratamako bevorzugen!

Rezept für 8 Stück:
  • 100g Shiratamako
  • 80g Zucker
  • 170ml Wasser
  • Kartoffelstärke
  • 8 Erdbeeren
  • 160g Koshian oder Tsubushian
1. Als erstes die Erdbeeren säubern und die Blätter entfernen. Jede Erdbeere mit der Bohnenpaste umhüllen (Spitzen freilassen). Beiseite stellen.

2. In einer Schüssel Shiratamako, Zucker und Wasser mischen und zu einem flüssigen Teig rühren. Die Schüssel mit einem Teller bedecken.

3. Die Masse in der Mikrowelle (ca. 700W) so lange garen bis sie transparent wird. Die Garzeit kann je nach Wattzahl variieren, daher die Masse immer wieder prüfen und umrühren. Die komplette Garzeit beträgt ca. 2-3 Minuten.

4. Die fertige Mochimasse nun auf eine mit Kartoffelstärke bemehlte Arbeitsplatte geben. Mit Kartoffelstärke bestäuben und mit einem Messer in 8 gleichgroße Stücke teilen.

5. Jedes Stück zu einer runden Scheibe formen und die Erdbeere mit Bohnenpaste damit komplett umhüllen. Den Mochiteig am Boden verschließen. Fertig ^^ 

Kamis, 24 Mei 2012

Sakura Yōkan / 桜羊羹


Just now, in this hot days, I like to make Yōkan for my family. It will take not long time. Only just 5 minutes. In addition, my daughter eats these jelly-like food very much. I like to Yōkan, that it is made of agar (gelling agent from seaweed). Somehow I've got always a better feeling when I make dishes with agar instead of gelatin. Due to the agar is Yōkan also suitable for vegans.

I have made quite a few different varieties of ​​Yōkan, but Sakura Yōkan lacks in my collection ;) So I tried the recipe from はじめてでも簡単!凛りんのとっておきお菓子. When you make all ingredients self (like me), the production is a bit time consuming. But the look and the great taste makes up for everything. 

How you can make homemade Shiroan and Sakuraan I've showed you here and here.
_____________________________________________________________________________________

Gerade jetzt bei diesem warmen Wetter mache ich sehr gerne Yōkan für meine Familie. Es geht wirklich sehr schnell und dauert gerade mal 5 Minuten. Außerdem ißt meine Tochter diese geleeartige Speise sehr gerne. An Yōkan gefällt mir auch sehr, dass es mir Agar, einem aus Algen gewonnen Geliermittel gemacht wird. Irgendwie habe ich da auch immer ein besseres Gefühl als wenn ich Speisen mit Gelatine mache. Aufgrund des Agar ist Yōkan auch für Veganer geeignet.

Ich habe nun schon so einige verschiedene Sorten Yōkan gemacht, nur Sakura Yōkan fehlte bis jetzt noch in meiner Sammlung ;) So habe ich mich dann auch mal an dem Rezept von はじめてでも簡単!凛りんのとっておきお菓子 versucht. Die Herstellung ist zwar etwas Zeitaufwendig wenn man wie ich alles selber macht, aber die Optik und der gute Geschmack macht alles wieder wett.

Wie ihr Shiroan und Sakuraan selber machen könnt habe ich ja bereits hier und hier gepostet.

Agar Riegel / Agar Bar

In the meantime, I've worked a lot with agar bars, Japanese agar powder and here in Germany in supermarket available Agartine powder. I must say that each agar gelled different. For Agartine and agar bars you need for example, more than the Japanese agar powder.
But in my opinion you noticed no difference in the consistency. And because I don't like constantly to experiment, I use usually only Agartine. I've gotten used to the dosing and it always succeeds (10g Agartine for 500ml liquid). But which agar you use, must you know.

I have for you written in my recipe the amount for Agartine. In the bracket you can find the amount of the original recipe. Please note, if you use agar bars, you must soak this at least for about half an hour before you cook it.

The amount is enough for a 14 x 11 cm form, but you can pour the mass also in any other molds. I've used here for example silicone muffin molds.

You need:
1. Bring in a pot 300ml water to a boil.

2. Add the agar into the boiling water and let cook for 2 minutes. Then add the sugar until it dissolve.

3. Remove the pot from the stove and stir the Sakuraan into the agar-water. Pour immediately into a mold and put in the refrigerator until it is completely firm.

4. Optionally, decorate the Yōkan with cherry blossoms.
_____________________________________________________________________________________

Mittlerweile habe ich auch schon viel mit Agar Riegel, japanischem Agar Pulver und die bei uns im Supermarkt erhältlichen Agartine ausprobiert und muss sagen das jedes Agar irgendwie anders geliert. Bei dem Riegel und Agartine braucht man zum Beispiel mehr wie bei dem japanischen Agar Pulver.
Da man aber meiner Meinung nach kaum ein Unterschied in der Konsistenz merkt und ich nicht ständig umher experimentieren mag, verwende ich meist nur noch Agartine. Ich habe mich mittlerweile an die Dosierung gewöhnt und es gelingt immer (10g Agartine auf 500ml Flüssigkeit). Welches Agar ihr aber letztendlich verwendet, müsst ihr entscheiden.

Ich habe für euch unten mal die Mengenangabe für Agartine aufgeschrieben. In der Klammer findet ihr die Mengenangabe des original Rezepts. Wenn ihr Agar Riegel verwenden sollten, müsst ihr allerdings wissen, dass ihr dieses mindestens erst eine halbe Stunde einweichen müsst bevor ihr es erhitzt.

Die Menge reicht für eine ca. 14 x 11 cm Form. Ihr könnt die Masse aber auch in jede andere beliebige Form gießen. Ich habe hier z.B. Muffin Silikonformen verwendet.

Ihr braucht:
1. In einem Topf 300ml Wasser zum kochen bringen.

2. Unter rühren das Agar in das kochende Wasser geben und für 2 Minuten kochen lassen. Anschließend den Zucker dazugeben und darin auflösen.

3. Den Topf vom Herd nehmen und das Sakuraan unterrühren. Sofort in eine Form füllen und im Kühlschrank aushärten lassen.

4. Optional kann das ganze anschließend noch mit Kirschblüten dekoriert werden.

Senin, 21 Mei 2012

Sakuraan / 桜あん


In the course of my Shironan production, I've made in following Sakuraan, because I could get cherry leaves from a nice friend. Sakuraan is just in the spring time a popular filling for various Japanese sweets and baked goods. For the rose paste will Shiroan simply mixed with a bit red food coloring and pickled, chopped cherry leaves. Who does not like the cherry leaves, can omit it. The recipe I have also from Cookpad.

First I colored the paste with the normal liquid red food coloring (water based) which you get in any supermarket. Unfortunately, this does not work very well. It simply wouldn't get rose. Fortunately, I had red oil based food coloring at home. This will used for example, to color white chocolate. With this food coloring it worked without problems. A small disadvantage is that you can get it maybe only in very large German supermarkets. I had ordered my oil-based food coloring some time in a online shop.

For 100g you need:
1. First, put the cherry leafs in a glass with water. Then cut the stalks with approaches from the leaves. Finally chop the leaves.

2. Heat in a pot the Shiroan with 1/2 teaspoon water over low heat. Add under stirring drop by drop the red food coloring until you have reached the desired color.

3. Finally mix the chopped cherry leaves with the pink paste.

_____________________________________________________________________________________

Im Zuge meiner Shironan Herstellung habe ich auch gleich noch Sakuraan hergestellt, da ich von einer lieben Freundin noch eingelegte Kirschblätter ergattern konnte. Sakuraan ist gerade im Frühling eine sehr beliebte Füllung für verschiedene japanische Süßigkeiten und Backwaren.
Für die rosa Paste wird Shiroan einfach noch mit etwas roter Lebensmittelfarbe und eingelegten, zerkleinerten Kirschblättern gemischt. Wer die Kischblätter gar nicht mag, kann sie auch weglassen. Das Rezept habe ich ebenfalls von Cookpad.

Ich hatte erst versucht die Paste mit der normalen flüssigen roten Lebensmittelfarbe (auf Wasserbasis) die man in jeden Supermarkt bekommt zu färben. Leider hat dies nicht sehr gut funktioniert. Die Paste wollte einfach nicht rosa werden. Ich hatte zum Glück noch rote Lebensmittelfarbe auf Ölbasis daheim. Diese wird z.B. zum färben von weiße Schokolade verwendet. Damit hat es ohne Probleme geklappt. Kleiner Nachteil, man bekommt sie vielleicht nur in sehr großen Supermärkten. Meine hatte ich mir damals online bestellen.

Für 100g braucht ihr:
1. Die Kirschblätter kurz in ein Glas mit Wasser legen. Anschließend Stiele mit Ansätze abschneiden. Blätter fein hacken.

2. In einem Topf Shiroan mit 1/2 TL Wasser auf kleiner Stufe erhitzen. Unter rühren Tropfen für Tropfen die rote Lebensmittelfarbe hinzugeben bis gewünschte Farbe entstanden ist.

3. Die zerhackten Kischblätter mit zur rosa Paste geben und unter mischen.

Shiroan / White Sweet Bean Paste / しろあん


In next time I will introduce you a few recipes where Shiroan is needed, so I would like to post the recipe today.
Shiroan is a white sweet bean paste (light anko) which is used very often in various Japanese confectionery and bakery products. For the production you needed white beans. You get them as small white beans (also known as navy beans) or as great white giant beans (also known as lima or butter beans). Both types of beans you can find in health food stores. See, for example here and here.
Please don't use precooked canned beans, the taste is completely different!

Shiroan is tedious to make, but because I don't get this bean paste here, I make it always self. But the result rewarded for the hard work. Because this procedure is very time-consuming, I make always the whole pack and freeze the paste into several portions.

To production I use always this recipe from Cookpad. The 50ml water in recipe I had never needed. Please add water as required. By the way, in the same way you can make from azuki bean the red Koshian paste.

You need:
  • 200g white beans
  • 140g sugar
  •  water as required
1. Wash the beans and soak overnight.

2. On the next day fill the beans in a pot and cover with water. Bring the water to a boil and let cook for 5 minutes, then reduce the heat to medium-high heat. Cook the beans until they are soft. If necessary, pour water over they again. The beans should be covered always with water!

3. Add the cooked beans in a colander, and strain through the sieve with a spoon.

4. Add the bean paste again in a pot, add sugar and a bit water and stir over medium heat until you have the desired consistency.

_____________________________________________________________________________________

Da ich demnächst noch einige Rezepte vorstellen werde bei denen Shiroan benötigt wird, möchte ich euch heute das Rezept dazu posten.
Shiroan ist eine weiße süße Bohnenpaste (helles Anko) die sehr häufig in verschiedenen japanischen Süßwaren und Backwaren verwendet wird. Für die Herstellung werden weiße Bohnen benötigt. Sie gibt es als kleine weiße Bohnen (auch als Navy Bohnen bekannt) oder als große weiße Riesenbohnen (auch als Lima Bohnen bekannt). Beide Bohnenarten findet man im Reformhaus. Meine sind von dem Hersteller Davert, siehe auch hier und hier.
Bitte keine vorgekochten Dosenbohnen verwenden, der Geschmack ist ganz anders!

Shiroan ist zwar etwas mühsam herzustellen, aber da ich die weiße Bohnenpaste hier nirgends bekomme, mache ich sie immer selber. Das Geschmacksergebnis belohnt aber für die Strapazen. Da es doch immer etwas Zeitaufwand ist, verarbeite ich dann immer die ganze Bohnenpackung und friere mir die Paste in mehreren Portionen ein.

Zur Herstellung verwende ich immer dieses Cookpad Rezept. Die im Rezept angegebenen 50ml Wasser brauche ich allerdings nie, da müsst ihr einfach nach Bedarf dazugeben. Auf die selbe Weise könnt ihr übrigens auch mit Azuki Bohnen die rote Koshian Paste herstellen.

Ihr braucht:
  • 200g weiße Bohnen
  • 140g Zucker
  • Wasser nach Bedarf
1. Die Bohnen waschen und über Nacht einweichen lassen.

2. Am nächsten Tag die Bohnen in einem Topf Füllen und mit Wasser bedecken. Das Wasser zum kochen bringen und 5 Minuten kochen lassen, danach die Hitze auf mittlere Hitze reduzieren. Die Bohnen solange kochen bis sie weich sind. Bei Bedarf immer wieder Wasser nachgießen. Die Bohnen sollten immer mit Wasser bedeckt sein!

3. Die weichen Bohnen in ein Sieb geben und mit einem Löffel durch das Sieb passieren. 

4. Das Bohnenmus nun wieder in einem Topf geben, Zucker und Wasser hinzufügen und bei mittlerer Hitze rühren bis ihr die gewünschte Konsistenz erreicht habt.

Jumat, 11 Mei 2012

Sakura Anko Mushi Pan / 桜のあんこ蒸しパン


Also, this recipe from おだんごカフェ@体に優しいナチュラルレシピ caught my eye. Not only because I love to eat Mushi Pan, but also because this recipe is completely vegan and is made ​​with koshian, soy milk and rice flour. Suited to the season, you should not be missed the cherry blossoms ^^

Here I've been already made Mushi Pan, but from ordinary wheat flour. However, in this recipe is rice flour (Joshinko) required. Please don't confuse with the glutinous rice Mochiko which will needed for mochi!

Also this variant with joshinko will steamed. This works very well and without problems. That the Mushi Pan rip during the steaming process is not a problem and is the result of the rice flour. At the original recipe it is also the same, so don't worry ;)

The consistency is also very fluffy and soft. This I would not have expect before. For me the taste was good, because the taste was not quite as sweet. But by the koshian you don't need add more sugar. But you must also know that this Mushi Pan get due to the rice flour the flavor of rice.

According to the recipe it should give 6 pieces. But in my muffin cups it makes only 4 pieces. But this is according to used muffin cups different. I use only silicone cups for Mushi Pan, because I've made not positive experience with paper cups.

For 4-6 pieces you need:
1. Soak the cherry blossoms in cold water.

2. Mix in a bowl joshinko with soy milk into a liquid batter. Then add koshian and packing powder and stir until the mixture becomes viscous.

3. Spread the batter in the muffin cups and garnish with a cherry blossom.

4. Place the cups in a bamboo steamer or pot with steamer basket and cover with a cloth. Steam for 15 minutes at high heat. During the steaming process, please do not open the lid, because the Mushi Pan can collapse!
_____________________________________________________________________________________

Auch dieses Rezept von おだんごカフェ@体に優しいナチュラルレシピ ist mir sofort ins Auge gefallen. Nicht nur weil ich Mushi Pan sehr gerne esse, sondern auch weil dieses Rezept ganz vegan ist und mit Koshian, Sojamilch und Reismehl gemacht wird. Zur Jahreszeit passend darf natürlich auch die Kirschblüte nicht fehlen ^^

Hier habe ich ja bereits mal Mushi Pan gemacht, allerdings aus normalem Weizenmehl. Bei diesem Rezept wird allerdings Reismehl (Joshinko) benötigt. Bitte nicht mit dem Klebreismehl Mochiko verwechseln, das für Mochi verwendet wird!

Auch diese Variante mit Joshinko wird gedämpft. Dies klappt sehr gut und ohne Probleme. Das der Mushi Pan beim dämpfen etwas aufreißt ist weiter nicht schlimm und ist sehr wahrscheinlich auf das Reismehl zurückzuführen. Bei dem Original Rezept ist das jedenfalls auch so, also keine Panik ;)

Die Konsistenz ist ebenfalls sehr fluffig und weich, das hätte ich vorher wirklich nicht so erwartet. Geschmacklich hat er mir ebenfalls gut geschmeckt, da er nicht ganz so süß geschmeckt hat. Aber durch das Koshian braucht man auch kein weiteren Zucker mehr hinzufügen. Man muss aber auch wissen, dass dieser Mushi Pan aufgrund des Reismehls auch eben etwas nach Reis schmeckt.

Mit den laut Rezept angegebenen 6 Stück bin ich ebenfalls nicht hingekommen. Bei mir ergab es nur 4 Stück. Kommt aber wohl auch die Muffinform drauf an. Ich verwende für Mushipan immer Silikonformen, da ich mit Papierformen keine so guten Erfahrungen gemacht habe.

Für 4-6 Stück braucht ihr:
1. Die Kirschblüten kurz in kaltem Wasser einweichen.

2. In einer Schüssel Joshinko mit Sojamilch zu einem flüssigen Teig rühren. Anschließend Koshian und das Packpulver unterrühren bis der Teig zähflüssig wird.

3. Den Teig auf die Muffinförmchen verteilen und mit einer Kirschblüte dekorieren.

4. In einem Bambusdämpfer oder Topf mit Dampfeinsatz setzen und mit einem Tuch abdecken. Für 15 Minuten bei hoher Hitze dämpfen. Während dem Dämpfvorgang bitte nicht den Deckel anheben, da die Mushi Pan sonst einfallen können!

Selasa, 24 April 2012

Ukishima with Matcha and Cakao / 浮島の抹茶とココア


Ukishima is a steamed cake made ​​of sweet bean paste and means in English as much as "floating island". The reason is probably the different two, sometimes three layers of this cake. Between these layers will often still given Amanattō (candied azuki beans), Kuromame (in syrup simmered black soybeans) or in syrup simmered chestnuts.

The recipe I made by Cookpad and it reaches for a 14 x 11 cm form. If you can't follow my description, you will also find there an picture for picture description :)

Unfortunately I had to improvise a bit, because I don't had Shiroan (white bean paste) at home. So I just used homemade Koshian, what I frozen for some time ago. Thus, the matcha layer becomes not a bright green, but the taste remains constant. The cake was in any case fluffy and soft and slightly moist in consistency, but this is probably normal by the Joshinko and the steaming process.

By the way Joshinko (non glutinous rice flour) and Hakurikiko (wheat flour with low gluten) you can get by Dae-Yang.

Basic dough for a 14 x 11 cm form:
  • 200g shiroan, optional koshian
  • 2 eggs (separated)
  • 20g sugar for the dough
  • 15g sugar for the beaten egg white
  • a pinch of salt
  • optional amanattō, kuromame or chestnuts
For the bright dough:
  • 1 tbsp joshinko
  • 1 1/2 tbsp hakurikiko
  • optional 1 tsp cocoa powder
For the green dough:
  • 1 tbsp joshinko
  • 1 1/2 tbsp hakurikiko
  • 1-2 tsp matcha
1. At first, lay a suitable heat-resistant form with baking paper out and bring in the meantime the water in the steamer to a boil.

2. Separate the eggs and beat the egg whites in a bowl with a pinch of salt until almost stiff. Then add the 15g sugar and beat the egg whites completely stiff. Set aside.

3. For the basic dough add in a new bowl the bean paste with the egg yolks and the 20g sugar and mix well. Give a half of the basic dough into a new bowl.

4. For the bright dough add in the first bowl with the basic dough Joshinko, Hakurikiko and cocoa powder and mix well. Add the half of the beaten egg whites to the dough and carefully fold in.

5. For the green dough add in the second bowl with the basic dough Joshinko, Hakurikiko and matcha and mix well. Add the other half of the beaten egg whites to the dough and carefully fold in.

6. Now fill at first the bright dough into the form. Then sprinkle some beans of your choice over the dough. After this fill the green dough in the form. Place the form with dough in the steamer, and steam for 20-25 minutes at high heat.

7. Turn the finished cake upside down, cover with a damp cloth, and let completely cool down.

8. Cut the cooled cake now in 1,5 - 2 cm thick slices and serve with tea or coffee.
_____________________________________________________________________________________

Ukishima ist ein gedämpfter Kuchen aus süßer Bohnenpaste und bedeutet im deutschen aufgrund seiner zwei, manchmal auch drei Schichten "Schwimmende Insel". Oft wird zwischen diesen Schichten noch Amanattō (kandierte Azuki Bohnen), Kuromame (in Sirup gekochte schwarze Sojabohnen) oder in Sirup gekochte Maronen gegeben.

Das Rezept habe ich nach Cookpad gemacht und ergibt einen Kuchen einer Form von 14 x 11 cm. Falls ihr meiner Beschreibung nicht folgen könnt, findet ihr dort auch eine Bild für Bild Beschreibung :)

Leider musste ich bei diesem Rezept etwas improvisieren, da ich kein Shiroan (weiße Bohnenpaste) daheim hatte. So habe ich halt selbstgemachtes Koshian verwendet was ich noch eingefroren hatte. Dadurch ist die Matcha-Schicht zwar nicht ganz so hellgrün geworden, dies tut dem Geschmack aber kein Abbruch. Der Kuchen war fluffig weich und auch etwas feucht in der Konsistenz, was aber wohl normal durch das Joshinko und das dämpfen ist.

Joshinko (nicht klebendes Reismehl) und Hakurikiko (Weizenmehl mit wenig Gluten) könnt ihr übrigens bei Dae-Yang bekommen.

Grundteig für eine 14 x 11 cm Form:
  • 200g Shiroan, optional Koshian
  • 2 Eier (getrennt)
  • 20g Zucker für den Teig
  • 15g Zucker für den Eischnee
  • eine Prise Salz
  • optional Amanattō, Kuromame oder Maronen
Für den hellen Teig:
  • 1 EL Joshinko
  • 1 1/2 EL Hakurikiko
  • optional 1 TL Kakaopulver
Für den grünen Teig:
  • 1 EL Joshinko
  • 1 1/2 EL Hakurikiko
  • 1-2 TL Matcha
1. Als erstes eine geeignete hitzebeständige Form mit Backpapier auslegen und Wasser im Dampfgarer zwischenzeitlich zum kochen bringen. 

2. Eier trennen und das Eiweiß in einer Schüssel mit einer Prise Salz fast steif schlagen. Anschließend die 15g Zucker unterrühren und Eiweiß komplett steif schlagen. Beiseite stellen.

3. Für den Grundteig die Bohnenpaste in eine neuen Schüssel geben und zusammen mit dem Eigelb und 20g Zucker schaumig rühren. Davon die halbe Grundmasse in eine neue Schüssel geben.

4. Für den hellen Teig nun Joshinko, Hakurikiko, Kakaopulver in die erste Schüssel mit dem Grundteig geben und gut verrühren. Eine Hälfte des Eischnees vorsichtig unterheben.

5. Für den grünen Teig nun Joshinko, Hakurikiko, Matcha in die zweite Schüssel mit dem Grundteig geben und gut verrühren. Die andere Hälfte des Eischnees vorsichtig unterheben.

6. Nun zuerst den hellen Teig in die Form füllen. Anschließend nach Belieben Bohnen nach Wahl darüber verteilen. Danach den grünen Teig darüber verteilen. Die Form in den Dampfgarer stellen, diesen verschließen und 20-25 Minuten bei hoher Hitze dämpfen.

7. Den fertigen Kuchen auf den Kopf drehen, mit einem feuchten Tuch bedecken und so komplett auskühlen lassen.

8. Den ausgekühlten Kuchen nun in 1,5 - 2 cm dicken Scheiben schneiden und zu Tee oder Kaffee servieren.

Senin, 27 Februari 2012

White Taiyaki / 白鯛焼き


Since I've my Taiyaki iron, I make also often at the weekend Taiyaki for my family and for my daughter her friends. Especially by children, the "fish-shaped waffles" are very popular. But I fill the Taiyaki not always with Anko, because the other kids don't like it. Then I fill them with nutella or chocolate pieces or jam. But even a filling of cheese or sausage is very popular. When you make the Taiyaki with a savory filling, then you should not make the dough so sweet.

Here, I already baked the Taiyaki in the golden brown version. There you will find a detailed description with pictures to make the Taiyaki.

I have already made very good experience with the gold-brown version, so I also wanted to try the white Taiyaki. The recipe I found at Cookpad. The difference between the two recipes is mainly that you used for the white Taiyaki tapioca flour instead of regular wheat flour. They look although colorless and thus not finished baked, but the dough is really finished baked and becomes inside very soft and fluffy. There is also white Taiyaki from rice flour, which have then a mochi-like consistency, but this I will try at the next opportunity.

In this recipe are used 50ml of milk, but this you can replace without problems by water. Then the Taiyaki are also suitable for lactose intolerant people and vegans.

Recipe for 3 white Taiyaki:
  • 100g tapioca flour
  • 50g wheat flour
  • 20g sugar
  • 5g baking powder
  • a pinch of salt
  • 80ml water
  • 50ml milk
  • anko or a filling of your choice
1. Mix in a bowl all ingredients with a mixer to a liquid dough.

2. Heat the Taiyaki-iron at medium heat (not to hot!), brush the iron with some oil and fill the lower mold completely with batter.

3. When the dough get a bit solidify, spread some of the filling in the center on the dough.

4. Pour over the filling immediately some of the dough and close the iron. Turn the iron and bake for 1-2 minutes over medium heat on this side. Turn the iron from time to time until the Taiyaki are ready-baked.

5. Remove the finished Taiyaki from the mould and cut the edge with a knife. Serve the Taiyaki warm or cold.
______________________________________________________________________________________

Seit dem ich mein Taiyaki-Eisen habe, bereite ich am Wochenende öfters auch Taiyaki für meine Familie und die Freunde meiner Tochter zu. Gerade bei Kindern kommen die "Waffeln in Fischform" sehr gut an. Ich fülle sie dann aber nicht immer mit Anko, da die anderen Kinder dies nicht so gerne mögen. Dann fülle ich sie mit Nutella oder Schokoladenstückchen, Marmelade oder auch eine Füllung aus Käse oder Wurst kommt sehr gut an. Bei herzhaften Füllungen sollte man den Teig dann aber nicht so süß machen.

Hier habe ich die Taiyaki ja bereits schon mal in der goldbraunen Version gebacken. Dort findet ihr auch eine detalliertere Beschreibung mit Bildern zur Herstellung der Taiyaki.

Da ich mit der goldbraunen Version schon sehr gute Erfahrungen gemacht habe, wollte ich nun auch mal die weiße Taiyaki ausprobieren. Das Rezept hierzu habe ich bei Cookpad gefunden. Der Unterschied zwischen beiden Rezepten ist nur das man für die weißen Taiyaki hauptsächlich Tapiokamehl statt normales Weizenmehl verwendet. Sie sehen zwar dadurch etwas farblos und nicht fertig gebacken aus, der Teig ist aber wirklich fertig gebacken und ist im inneren schön weich und fluffig geworden.
Es gibt auch noch weiße Taiyaki aus Reismehl, die dann eine Mochi ähnliche Konsistenz haben sollen, dieses werde ich aber bei Gelegenheit dann noch mal ausprobieren.

In diesem Rezept werden ja 50ml Milch verwendet, dieses kann man aber auch ohne Probleme durch Wasser ersetzen. Dann sind die Taiyaki auch für laktoseintolerante Menschen und Veganer geeignet.

Rezept für 3 weiße Taiyaki:
  • 100g Tapiokamehl
  • 50g Weißenmehl
  • 20g Zucker
  • 5g Backpulver
  • eine Prise Salz
  • 80ml Wasser
  • 50ml Milch
  • Anko oder Füllung nach Wahl
1. Für den Teig in einer Schüssel alle Zutaten mit einem Mixer zu einem flüssigen Teig rühren.

2. Das Taiyaki-Eisen auf mittlerer Hitze erwärmen (nicht zu heiß!) und mit etwas Öl einpinseln und die unteren Mulden  komplett mit Teig füllen.

3. Wenn der Teig etwas gestockt ist, mittig etwas von der Füllung auf dem Teig verteilen. 

4. Die Füllung sofort mit etwas Teig übergießen und das Eisen schließen. Das Eisen umdrehen und für 1-2 Minuten bei mittlerer Hitze auf dieser Seite backen. Das Eisen immer mal wieder wenden bis die Taiyaki fertig gebacken sind.

5. Die fertigen Taiyaki aus der Form lösen und den Teigrand mit einem Messer abschneiden. Die Taiyaki warm oder kalt servieren.

Senin, 16 Januari 2012

Anpan / 餡パン


Last weekend I baked Anpan again. These are with Anko filled yeast buns. I bake this buns very often on weekends for my family, because they are very easy to make, it's really fluffy-soft and everyone in my family love it. They snatch them really out of my hand ;) I guess, on my baking scale Anpan lies on second place.

Anpan were the first type buns, which Japanese have baked. "An" stands for Anko, "pan" for bread. In Japanese bakeries I have seen them also with "shiro-an" a white bean paste, chestnut and sesame paste ^ - ^

The anime fans among you know certainly also the Japanese cartoon character Anpanman. He has a head made of Anpan and is very well known in Japan. I find the series very cute, because there are many figures which have to do with food.

Tip: Of course, Anpan tastes best fresh. But you can wraped it immediately after the cool down in the plastic wrap, so it still taste next day very good. Therefore it is also super suitable for bento.

Recipe for 10 pieces:
  • 450g flour Type 550
  • 20g yeast
  • 4 tbsp sugar
  • 1 egg, separated
  • 200ml milk
  • 1 pinch salt
  • 45g butter
  • 1 tsp water
  • 1 tbsp black sesame
  • 200g anko
1. Add the flour with the sugar and salt in a bowl and mix together. Dissolve the yeast in lukewarm milk. Heat the butter until it becomes liquid. Separate the egg.

2. Add the yeast-milk-mixture with the melted butter and the egg white to the flour into the bowl and knead to a smooth dough.

3. Cover the bowl with the dough with a clean towel and let rest at least 40 minutes in a warm place. The dough should be then become visibly larger.

4. Add the dough on a floured work surface and knead the dough again. Then divide the dough into 10 evenly sized pieces.

5. Flatten each piece of dough with your hand and set in the middle a tablespoon Anko. Wrap the Anko into the dough and shape into a ball. Put the balls with a little distance on a baking sheet with baking paper. Cover it with a towel again and let rest for another 15 minutes.

6. Now mix the egg yolk with one teaspoon water and brush the Anpan with it all around. Sprinkle some black sesame seeds on the top.

7. Bake the Anpan in the 180 °C preheated oven on middle shelf for about 12-15 minutes until it is golden brown.

______________________________________________________________________________________

Letztes Wochenende habe ich mal wieder Anpan gebacken. Das sind mit Anko gefüllte Hefebrötchen. Sie gibt es sehr oft am Wochenende bei uns, da sie wirklich sehr einfach zu machen sind, schön fluffig-weich werden und sie jedermann bei uns gut schmecken. Ich bekomme sie regelrecht aus den Händen gerissen ;) Glaube auf meiner Backskala liegt Anpan bei mir an zweiter Stelle.

Anpan waren die ersten Art Brötchen die von Japanern gebacken wurden. "An" steht für Anko, "pan" für Brot. In japanischen Bäckereien habe ich sie auch schon oft mit "Shiro-an" einer weißen Bohnenpaste, Kastanien oder Sesampaste gefüllt gesehen ^-^

Die Anime Fans unter euch kennen bestimmt auch die japanische Comic Figur Anpanman. Sie hat einen Kopf aus Anpan und ist in Japan sehr bekannt. Ich finde die Serie ganz niedlich, da hier auch immer verschiedene Charaktere auftauchen die was mit Essen zu tun haben.

Tipp: Am besten schmecken die Anpan natürlich frisch, aber wenn man sie gleich nach dem auskühlen in Frischhaltefolie wickelt, kann man sie auch noch gut am nächsten Tag essen. Daher sind sie auch super für Bento geeignet.

Rezept für 10 Stück:
  • 450g Mehl Type 550
  • 20g Hefe
  • 4 EL Zucker
  • 1 Ei, getrennt
  • 200ml Milch
  • 1 Prise Salz
  • 45g Butter
  • 1 TL Wasser
  • 1 EL schwarzer Sesam
  • 200g Anko
1. Das Mehl mit dem Zucker und Salz in eine Schüssel geben und miteinander vermischen. Die Hefe in lauwarmer Milch auflösen. Butter erhitzen bis sie flüssig wird. Ei trennen.

2. Die Hefe-Milch-Mischung zusammen mit der flüssigen Butter und dem Eiweiß mit zu dem Mehl in die Schüssel geben und zu einem geschmeidigen Teig verkneten.

3. Die Schüssel mit dem Teig mit einem sauberen Tuch abdecken und für mindestens 40 Minuten an einem warmen Ort ruhen lassen. Der Teig sollte dann Sichtbar größer geworden sein.

4. Die Arbeitsfläche etwas bemehlen und den Teig darauf geben und nochmals gut durchkneten. Anschließend den Teig in 10 gleichmäßig große Stücke aufteilen.

5. Jedes Teigstück mit der Hand platt drücken und in die Mitte ein EL Anko setzen. Anko mit dem Teig umschließen und zu einer Kugel formen. Die Kugeln mit etwas Abstand auf einem mit Backpapier ausgelegten Backblech setzen, mit einem Tuch abdecken und nochmals 15 Minuten ruhen lassen.

6. Nun das Eigelb mit einem TL Wasser verquirlen und die Anpan rundum damit bestreichen, mit etwas schwarzem Sesam bestreuen.

7. Im 180 C° vorgeheizten Backofen die Anpan auf mittlerer Schiene ca. 12-15 Minuten goldbraun backen.

Kamis, 20 Oktober 2011

Taiyaki / 鯛焼き


Today I post the recipe for Taiyaki, which translated means "baked sea bream".
Taiyaki are a type of fish-shaped waffles. You need a taiyaki iron if you want to make them. In Japan they are very popular. You can found them in supermarkets, but also at different festivals as well as on street booths. It is not known how these pastry get this typical fish-shape. I found it to this time of year in any case very suitable ^-^

Taiyaki I bake meanwhile much rather than German waffles, because the batter is not so greasy.
Certainly, anko i not a must. You can fill the taiyaki with what you want, such as chocolate-cream, pudding, jam, but also  cheese or sausages are very popular. Even the okonomiyaki filling and much more filling sorts are very popular in Japan, see here (jap.)

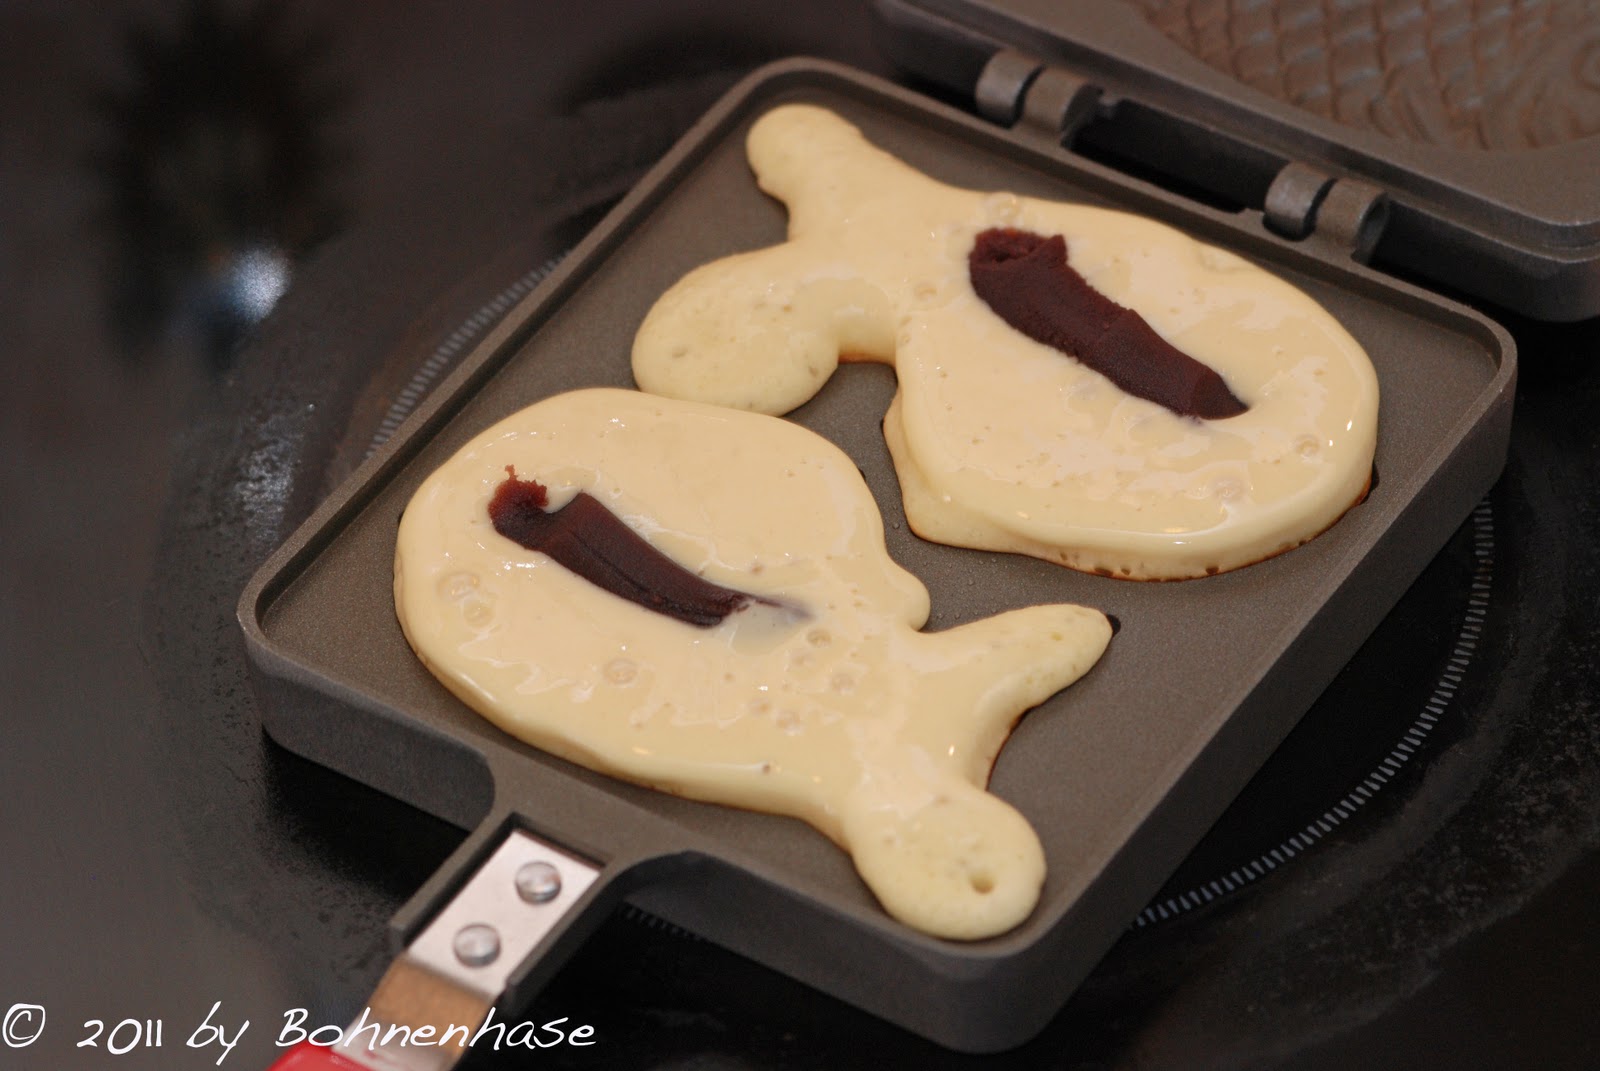
As you can see below on the picture, I have baked my taiyaki on a ceran stove. This works very well and without problems. They will even uniformly brown, what I had not really thought before. On a induction stove the iron works not.

The taiyaki I made by the recipe from Cooking with dog. However, I must change the indication of quantity before I made perfect taiyaki. Otherwise they get very fast and easy to prepare.

Makes approx. 8 pieces:
  • 200g Flour
  • 2 1/2 tsp Baking Powder
  • 70g Sugar
  • 2 Eggs
  • 240ml Water
  • 200g Anko
______________________________________________________________________________________

Heute gibt es das Rezept zu Taiyaki, was Übersetzt soviel wie "Meerbrassengebäck"bedeutet.
Taiyaki sind eine Art Waffeln in Fischform. Man kommt nicht drumherum ein Taiyaki-Eisen zu kaufen wenn man sie machen möchte. In Japan ist dieses Gebäck sehr populär. Man findet es in Supermärkten, aber auch auf verschiedenen Festen wird es an Straßenständen verkauft. Wie dieses Gebäck allerdings seine "Fischform" erhalten hat ist aber ungewiss.
Ich finde sie zu dieser Jahreszeit jedenfalls sehr passend ^-^

Taiyaki backe ich mittlerweile viel lieber wie Deutsche Waffeln, da der Teig nicht so fettig ist.
Anko ist natürlich kein Muss. Ihr könnt die Taiyaki füllen mit was ihr möchtet, wie z.B. Schoko-Creme, Pudding, Marmelade, aber auch herzafte Füllungen wie Käse oder Würstchen sind möglich. Sogar die Variante mit Okonomiyakifüllung scheint sehr angesagt zu sein, schaut hier (jap.)

Wie ihr auf den Bildern unten sehen könnt, habe ich meine Taiyaki auf einem Ceranherd gebacken. Das funktioniert sehr gut und ohne Probleme. Die Taiyaki werden sogar gleichmäßig braun, was ich vorher wirklich nicht gedacht hätte. Auf einem Induktionskochfeld funktioniert die Pfanne allerdings nicht.

Die Taiyaki habe ich nach dem Rezept von Cooking with dog gemacht. Habe allerdings die Zutaten etwas ändern müssen bis sie bei mir perfekt geworden sind. Sie gehen sonst schnell und recht einfach in der Zubereitung.

Ergibt ca. 8 Stück:
  • 200 g Mehl
  • 2 1/2 TL Backpulver
  • 70g Zucker
  • 2 Eier
  • 240 ml Wasser
  • 200g Anko
1. Mix the flour with baking powder and sugar. Add the eggs and water to the flour and stir very quick to a smooth batter without lumps.
________________________________________________________
1. Das Mehl mit dem Backpulver und dem Zucker vermischen. Die Eier und das Wasser dazugeben und zügig zu einem glatten Teig verrühren bis keine Klümpchen mehr zu sehen sind.

2. Put the taiyaki iron on the ceran stove or gas cooker and heat up on medium heat. Please don't heat to hot, otherwise the batter burns to fast and the rest of batter inside is still raw!
________________________________________________________
2. Das Taiyaki auf die Herdplatte oder Gasflamme legen und auf Mittlerer Stufe erhitzen. Bitte nicht zu heiß werden lassen, sonst brennt der Teig gleich an und der restliche Teig ist noch roh!

3. Open the iron and brush with some oil. Fill in the lower side the moulds with batter until the fish is completely covered.
______________________________________________________
3. Das Eisen aufklappen, mit etwas Öl einpinseln und auf der unteren Seite in die Mulden Teig füllen bis der Fisch komplett bedeckt ist.


4. When the batter is slightly firm, fill something anko or any other filling in the middle of the batter.
_______________________________________________________
4. Wenn der Teig etwas gestockt ist, nun das Anko oder andere beliebige Füllung mittig auf dem Teig verteilen.


5. The filling immediately pour over with some batter, ...
________________________________________________________
5. Die Füllung sofort mit etwas Teig übergießen, ...


6. Close the iron and turn on the other side and bake until ready. Bake the taiyaki until they get golden brown. Turn the teriyaki iron from time to time.
________________________________________________________
6. das Eisen schließen, umdrehen und auf der anderen Seite weiter backen. Die Taiyaki solange backen, bis sie eine goldbraune Farbe erhalten, ggf. das Eisen immer mal wieder wenden.

7. Take the finished teriyaki from the iron. Cut the edge with a knife and serve hot or cold.
_______________________________________________________
7. Die fertigen Taiyaki aus der Form nehmen, den Rand mit einem Messer abschneiden und heiß oder kalt servieren.


Incidentally, there are also white taiyaki. These are made of rice flour that is used to make mochi or made of tapioca flour. This taiyaki are not as crisp as the golden brown version, but have a mochi-like consistency.
______________________________________________________________________________________
Übrigens gibt es auch  weiße Taiyaki. Diese werden aus Reismehl das man zur Mochi-Herstellung verwendet oder Tapiokamehl gemacht. Diese Taiyaki sind natürlich nicht so knusprig wie die golbraune Version, sondern haben eine Mochi ähnliche Konsistenz.